How to Clean an Electric Grill: Quick Steps
A greasy, neglected electric grill does more than ruin the taste of your food. It creates a real fire hazard, heats unevenly, and shortens the life of your appliance. The good news? Electric grills are actually the easiest grills to clean. No ash, no fuel lines, no flare-ups. Just unplug, soak, scrub, and reassemble.
This guide gives you a complete, step-by-step routine for cleaning any electric grill safely. You will learn how to handle heating elements, remove carbon buildup, and use simple household items like baking soda and vinegar to deep-clean without damage. Whether you grill every weekend or once a month, these habits keep your unit ready for perfectly seared meals.
Unplug and Cool Down Completely
Touching the wrong component at the wrong time can cause burns or electrical shock. Safety always comes before scrubbing.
Disconnect Power First
Always unplug the grill from the wall outlet before cleaning, even if your model has an auto shut-off feature. If your grill has a removable heating element, disconnect it fully and set it aside in a dry spot before you begin.
Let the Grill Reach Room Temperature
Never clean a hot grill. High heat can warp non-stick coatings and burn your hands. Light scraping is fine on a warm surface, but deep cleaning with water requires the unit to be completely cool. Wait at least 30 to 45 minutes after use.
Remove and Soak the Removable Parts

Disassembling the grill exposes the greasy areas you cannot reach otherwise. This step does most of the heavy lifting for you.
Take Out Grates, Drip Trays, and Flavorizers
Remove the grilling plates, drip trays, and any flavorizer bars. If your model allows heating element removal (usually secured with screws), check your manual before unscrewing anything. Doing so exposes the cooking bowl, where grease quietly accumulates.
Soak in Warm, Soapy Water
Place grates and trays in a sink filled with warm water and mild dish soap. Let them soak for 10 to 30 minutes. Soaking softens burnt-on food and sticky residue, turning a tough scrub job into a quick wipe. For enameled cast-iron grates, pre-soaking protects the finish from aggressive scrubbing.
Scrub Grates and Trays Without Damage
Now that grime is loosened, you can remove it without scratching your grill’s surfaces.
Use Non-Abrasive Tools
Choose a stainless steel brush only if it is designed for grill grates. For enameled or non-stick surfaces, stick with a soft sponge or nylon brush. Avoid steel wool entirely. It scratches coatings and can leave behind metal fragments that create electrical hazards.
Clean Drip Trays Gently
Drip trays collect oil and debris from every cookout. Use a plastic scraper to lift residue, then wash with soapy water. Do not bend or puncture the tray, since damage can cause leaks during future use.
Rinse and Dry Thoroughly
Rinse every part under clean running water. Shake off excess moisture, then dry completely with a clean cloth. Damp components lead to rust, especially on cast iron or exposed metal edges.
Clean the Interior and Heating Element Area
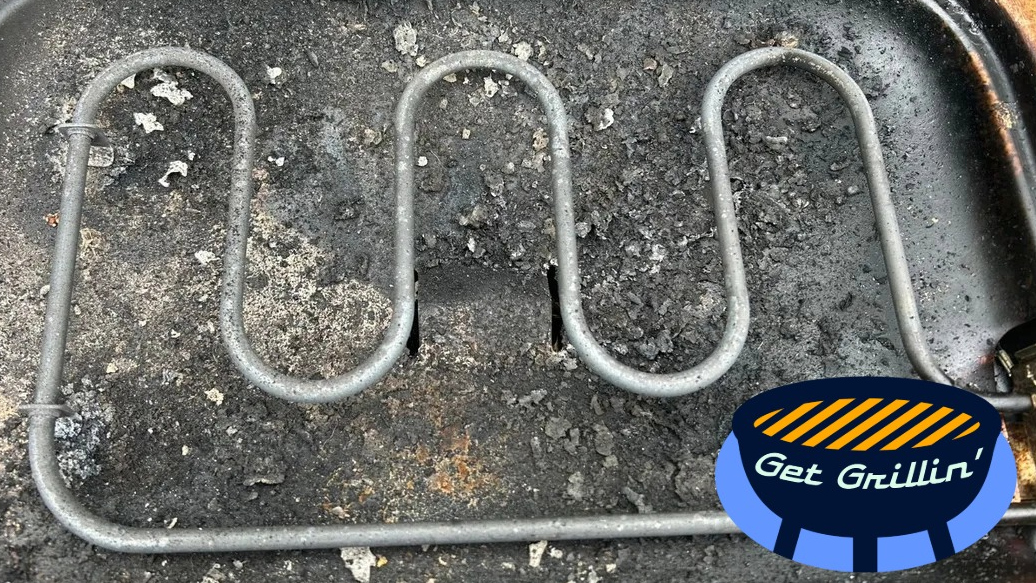
The inside of your grill and the zone around the heating element are the highest-risk areas for fire if neglected.
Wipe Down Interior Surfaces
Use a damp microfiber cloth to wipe the inner cooking chamber. Focus on corners and crevices where grease builds up over time.
Treat Stubborn Spots with Baking Soda
For stuck-on residue, mix baking soda with a small amount of water to form a thick paste. Apply it to greasy areas and let it sit for 10 to 15 minutes. Gently scrub with a soft brush, then wipe clean. Baking soda is a natural abrasive that will not harm non-stick coatings.
Clean Under the Heating Element
If you removed the heating element, the bowl beneath it likely holds hidden grease and food particles. This is the most overlooked fire hazard on any electric grill. Use a plastic scraper or paper towel to lift debris, then wash the bowl with soapy water. A narrow crevice brush works well for tight spots.
Never Wet the Heating Element
The heating rod must never be submerged or sprayed with liquid. It self-cleans during high-heat operation. When cool and unplugged, wipe it lightly with a dry or barely damp cloth. Never let moisture enter the electrical connections.
Maintain the Lid and Exterior
Grease and carbon deposits build up on the lid and outer casing, affecting both appearance and hygiene.
Remove Carbon Flakes from the Lid
Black flakes on the lid are usually carbon buildup, not peeling paint. Use a plastic scraper to gently lift them off, then wipe with a damp cloth or paper towel. Never use metal tools, which can puncture or scratch the lid lining.
Wipe Down the Housing and Controls
Clean the exterior with a mild detergent and a non-scratching sponge. Pay attention to handles and control panels. For the temperature dial and power cord, use a warm, soapy cloth and dry immediately. Never immerse these parts in water.
Reassemble and Store the Grill Properly
A clean grill only stays safe and functional if you put it back together correctly.
Dry Every Part Before Reassembly
Moisture causes rust and electrical problems. Double-check that grates, trays, and the cooking bowl are fully dry before reassembly. Reattach the heating element securely if you removed it.
Confirm Correct Component Placement
Misaligned grates or trays can affect heat distribution. Make sure each piece fits snugly in its designated slot. Plug in the unit only after full reassembly.
Follow a Simple Maintenance Schedule
Regular upkeep prevents deep buildup and extends your grill’s lifespan.
Clean After Every Use
Scrape grates while warm (not hot) with a silicone spatula or plastic scraper. Wipe plates with a damp cloth, empty the drip tray, and clean the exterior. This takes less than 5 minutes and dramatically cuts down on deep-cleaning time later.
Perform Monthly Deep Cleans
Once a month, do a full teardown. Soak and scrub all removable parts, clean under the heating element, and inspect for rust or wear. Check air vents for blockages and wipe the lid thoroughly.
Seasonal Checks and Storage Tips
Before storing for winter or long breaks:
– Inspect the housing for rust and treat with a grill-safe rust remover if needed.
– Coil the power cord neatly and store it in a dry place.
– Use a waterproof cover if the grill stays outdoors.
– Make sure drip trays are empty to avoid odors and pests.
Choose Safe Cleaning Agents
The right cleaner protects your grill and your health.
Stick to Mild, Natural Solutions
- Dish soap and warm water: Ideal for daily cleaning.
- Baking soda paste: Breaks down grease safely.
- Vinegar solution (1:1 white vinegar and water): Spray on grates, wait 10 minutes, then scrub for a chemical-free deep clean.
Avoid Harsh Chemicals
Never use bleach, ammonia, or abrasive cleaners. They degrade non-stick surfaces, damage plastic components, and may leave toxic residues that transfer to food.
Try These Pro Cleaning Hacks
A few smart tricks can make cleanup faster and easier.
Aluminum Foil Scrub Trick
Crumple a ball of aluminum foil and use it to scrub grates. The firm texture lifts tough crusts without scratching, making it perfect for quick mid-grill cleanups.
Onion Grate Cleaner
Cut an onion in half. While the grill is warm (not hot), rub the cut side across the grates. The natural juices loosen debris and leave behind a mild, non-stick layer.
Pre-Oil Grates Before Cooking
Apply a light coat of cooking oil to grates before heating. This creates a barrier that prevents food from sticking, drastically reducing post-cook scrubbing.
Troubleshoot Common Electric Grill Problems

Fix small issues before they become safety hazards.
“Peeling” Lid Coating
If black flakes appear on the lid, do not panic. It is likely carbonized grease, not damaged paint. Scrape gently with plastic, then wipe clean. Prevent buildup by wiping the lid monthly.
Hidden Fire Hazard: Grease Under the Element
This is the most overlooked danger. Grease collects under the heating element and can ignite during use. If your manual allows, remove the element monthly and clean the bowl beneath with soapy water and a crevice brush.
Rust on the Housing
Outdoor grills often develop surface rust. Treat it early with a rust remover made for appliances. Prevent recurrence by covering the grill and drying it completely after cleaning.
Are Parts Dishwasher Safe?
- Grates: Most enameled cast-iron grates are dishwasher safe, but hand washing preserves seasoning and prevents chipping.
- Drip trays: Often dishwasher safe, but check your manual first.
- Heating elements, cords, controllers: NEVER put these in the dishwasher. Water damage is irreversible.
Frequently Asked Questions About Cleaning an Electric Grill
Can you submerge an electric grill in water?
No. Never submerge the main housing, heating element, controller, or power cord. Water causes irreversible electrical damage. Only removable grates and drip trays can be soaked.
How often should you deep clean an electric grill?
Perform a quick clean after every use and a full deep clean once a month. If you grill heavily, consider deep cleaning every two weeks to prevent grease buildup.
What is the black stuff peeling off my grill lid?
Those black flakes are carbonized grease and smoke residue, not peeling paint. They are non-toxic but should be removed with a plastic scraper and a damp cloth.
Can I use a metal brush on electric grill grates?
Yes, but only on the grates themselves, and only if the brush is designed for grill use. Never use metal brushes on non-stick coatings, the interior housing, or the lid.
Is baking soda safe for cleaning electric grills?
Yes. Baking soda mixed with water forms a gentle paste that cuts grease without scratching non-stick surfaces or damaging metal finishes. It is one of the safest and most effective cleaners available.
Do electric grills have self-cleaning functions?
Some modern models, like certain SMART-E and EVOLVE Electric grills, feature an AUTO-CLEAN pyrolysis cycle. Even with this function, manual brushing is still required after the cycle completes.
Key Takeaways for Keeping Your Electric Grill Clean
Cleaning an electric grill is quick, safe, and essential. Always unplug first, wait for the grill to cool, and use non-abrasive tools on every surface. Soak grates and drip trays in warm soapy water to make scrubbing effortless, and never submerge heating elements or electrical components. Clean under the heating element every month to prevent grease fires, and stick to mild cleaners like dish soap, baking soda, and vinegar.
Your next step is simple: set a reminder to do a monthly deep clean, and commit to a 5-minute wipe-down after every cookout. With these habits, your electric grill will deliver crisp, seared results for years without smoke, surprises, or safety risks.